Shape Smart offers it’s own installation service.
Make use of our professional installers to get an excellent result!
We pride ourselves on the excellent quality of our workmanship which we offer at very affordable prices.
Should you prefer to go the DIY route, below are some pointers.
Cornice Installation:
You will need:
- High quality Cornices
- Acrylic Cornice Adhesive
- Sponge or clean cloth
- Caulking gun
- Mitre box
- Chalk line and pencil
- Putty knife
- Extra fine sandpaper
Before Starting
- Start by measuring your room to determine linear meters of moulding needed
- Add 10% to 15% of total length for cutting waste.
- Sponge or clean cloth
- Clean all surfaces free of dirt and loose particles with a clean cloth or sponge.
- Make sure area is completely dry before installing product.
To Mitre Corners
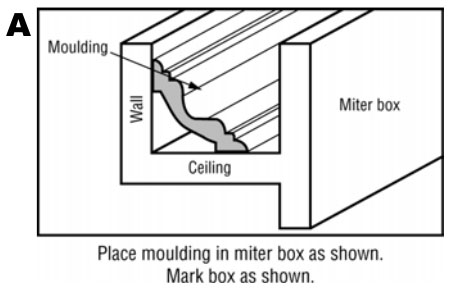
- The key to successful mitred corners is placing the moulding correctly in the mitre box.
- The moulding should be placed in the box so that the ceiling bedding edge of the moulding lies against the bottom of the box or saw and the wall bedding edge of moulding lies against the side of the mitre box opposite you.
TIP: Before cutting, label the mitre box bottom “CEILING” and the side with “WALL” [A].
- Cut all mitres and butt joints before you install moulding.
Cutting of Inside Corners
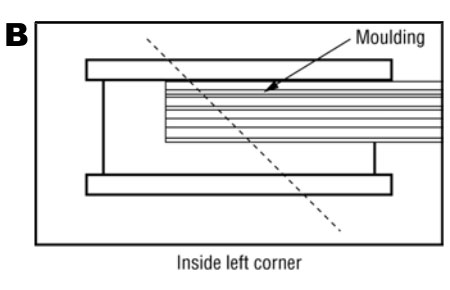
- ake two pieces of moulding that will be used for your first inside corner.
- TPlace the LEFT length of moulding in the box as described above and cut at 45 degrees.
- Your saw should point left [B].
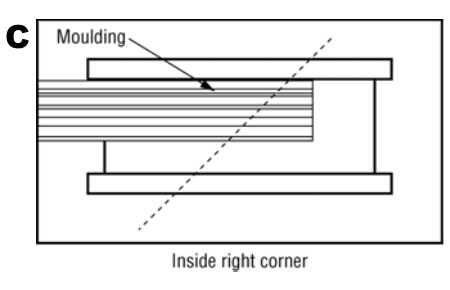
- Next place the RIGHT length of moulding in the mitre box.
- Cut the right mitre with your saw pointing right [C].
- Check your cuts by placing the two mitred ends together, to insure a good fit.
Mitreing Outside Corners
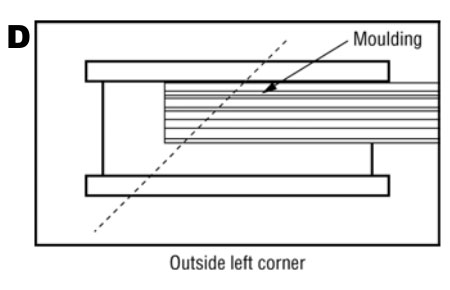
- Take two pieces of moulding that will be used for your first outside corner.
- Place the LEFT length of moulding in box as described above and cut at 45 degree � your saw should point right [D].
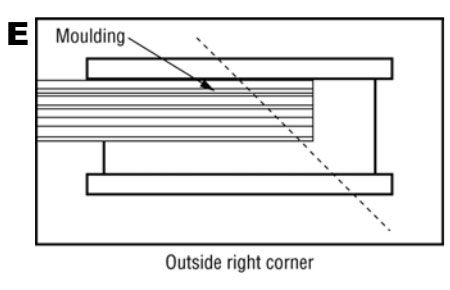
- Next place the RIGHT length of moulding in the mitre box and cut the right mitre with your saw pointing left [E].
- Check your cuts by placing the two mitred ends together, to insure a good fit.
Mitreing Outside Corners
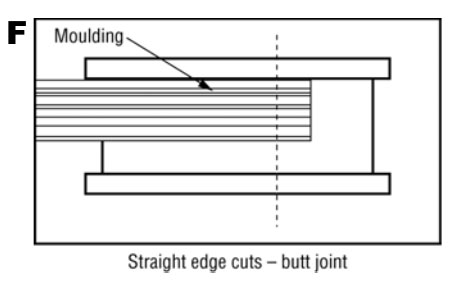
When moulding lengths do not span the entire length of a room, you will need to butt two moulding lengths together.
- Lay the moulding in the mitre box the same as described above and cut a straight edge [F].
General Installation
- First mark the entire length of wall around the room with your chalk line box and pencil. You will mark the bottom edge of the moulding.
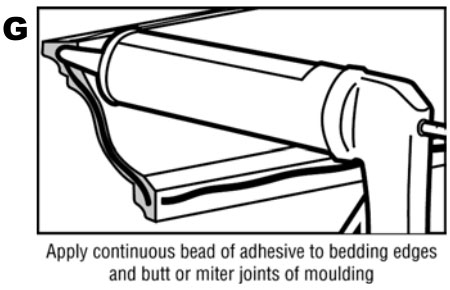
- Apply a continuous bead of acrylic cornice adhesive along the backside top and bottom edges of moulding [G] and at butt joint ends.
- Use adhesive to fill any gaps.
- Gently press the moulding into place.
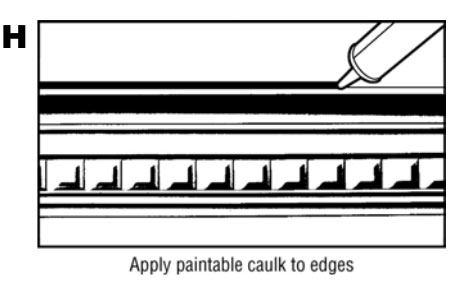
- Apply cornice glue to moulding edge and smooth excess with your finger or putty knife, giving the appearance of the moulding being part of the wall [H].
- Wipe any excess adhesive from edges and clean a damp cloth.
Painting
- Paint, making sure you use only water based paints such as an acrylic.